Saturday, November 7, 2015

For your Mistle"toes" with FREE Printables


I love Christmas. I love giving gifts. I love making things. That makes this next project the best since it covers all three!

I have made a few different versions of this before, but decided I wanted to change it up for the blog. I have so many females in my life of all different ages, but one thing that most of them have in common, a love for pretty nails.

I did three different styles of the tags and I really can't even decide which one I love the most. I'm leaning toward the plain kraft ones though. Kraft paper has a special place in my heart.

I mean, look at these beauties!


All you need is a little washi tape and a paper lunch bag to make a cute little gift with pedicure goodies inside!


Then, voila! Instant adorable and super easy gift! This would be perfect for a hostess or even a guy that likes the occasional pedicure. 


Then again, these colors just scream my name! Red and aqua are my absolute fave Christmas colors!


Use some bakers twine, hole punch, and some nail polish to make a super quick gift. By the way, this is our THIRD bottle of this gold Fergie polish. We lurve us some gold nails (or toenails) over here. :)


Sing it with me now...."Golden nail polishes tied up with string, these are a few of my favorite things!"


We are talking about girly girl things like nail polish, so pink and aqua are a must have too!


Grab yourself one of the little buckets from Target (don't you even LIE and say you don't have one, we are all Target obsessed 'round here), a few bottles of polish, a cute and glittery emery board, and this super awesome pack of Essie 'sleek stick' nail decals. As you can see, I stuck with the color theme. I'm a bit OCD like that. You're welcome.


Throw a sheet of tissue paper in the bottom of the bucket. Why yes, the tissue paper was aqua too! Put everything else in all cute like and tie the tag on.


BOOM! Done! You have now become the favorite aunt, sister, niece, daughter, friend, yadda, yadda, yadda, ever. Once again, you're welcome! 


If you like the kraft ones, click here.
  • These are actually just black text on a white background, so you can print them on any color paper! I just chose kraft because it's my favorite.

If you like the red and aqua ones, click here.

If you like the aqua and pink ones, click here.

If you like them all then I guess that makes me pretty awesome. :)


Thank you so very much for stopping by today! I hope you get tons of use out of these printables! 

Love&Hugs


Friday, October 30, 2015

Homemade Halloween Donuts! *The Easy Way!


There is do denying around our house that we like food. Mix a fun holiday like Halloween with it and we are totally game! 

I would love to give credit to the originator of this ridiculously cute idea, but I have no clue who that is. I remember seeing a version of this while scrolling through my Pinterest feed a few years back and knew that eventually, we would have to do it! 

All the ones we had seen though, used store bought donuts. We loooooove making homemade ones. They are so easy! All you need are two main ingredients. TWO! That's it!
  • Oil (we use Canola, but whatever oil you prefer should work fine)
  • Biscuits (Just use the good 'ole cheap buttermilk biscuits)


Now, to get them tasty, you need a few more ingredients. Here are some we use:
  • Powdered Sugar
  • Cinnamon and Sugar (our favorite)
  • Melted Chocolate
  • Glaze - You can make this by simply mixing together powdered sugar and water to the right consistency.


Now that you have your ingredients, let's get started! Before you open the donuts, go ahead and heat your oil. You'll want about an inch or so of oil in your pan for these. I suggest using a smaller pan so you aren't wasting any oil. These donuts cook pretty quickly, so unless you are making some for an entire football team, a small pan would work perfectly. I put my burner on four, so not quite half way. We don't want them to get too brown. 

First, get your biscuits out and lay them out. I lay mine on a cutting sheet, but you could use some wax paper, aluminum foil, or even a plate. 

We have tried a lot of things to cut the center out and I have found that the best one is a medicine cup. I'm sure everyone has a few of these (especially if you have kids!) in their house, so no need to buy anything for this step. 


Press the biscuits down a bit with the palm of your hand just to flatten them a little. 

Cut the center out by pressing down the medicine cup and twisting it back and forth. 


This is what it will look like.


Now you have a donut and a donut hole!

Your oil should be hot by now so go ahead and gently put your donuts in.


Sorry I only have photos of the donut holes! I got a phone call and my daughter went on without me. All she had left when I came back were the holes! :)


Let them get a nice golden brown. We turn ours with long tongs so no one gets burnt by the oil.

Once both sides are done, lay them on a plate covered with paper towels to soak up excess oil. 


Once they have a few seconds to sit (while they are still warm), go ahead and coat them with whatever topping you want. Here we have a mixture of cinnamon and sugar.

To make them as cute as can be, add a few dots of melted chocolate for the eyes and a pair of vampire teeth! Our vampire teeth came from Target. It was a pack of eight for $1. 


The kids love making these and eating them! It's a super fun way to start your Halloween! 

Happy Haunting everyone and hope you have a great weekend!

Love&Hugs


Friday, October 23, 2015

No Tricks, Just Treats *Free printable tag!


Halloween is almost here and what better way to celebrate than with baked goodies? Then again, I say that for every holiday....or really any day ending in y. What? I like cookies. Don't judge me. 

On any given day my daughter or I will be making cookies, cupcakes, brownies, bars, or dipping something in chocolate. That is special bonding time together for us.

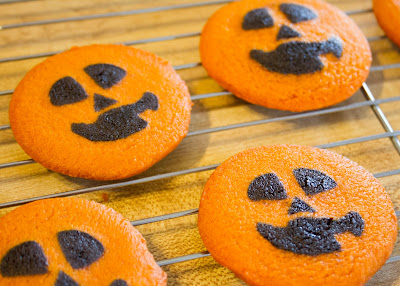
My smaller girls (three and five) enjoy doing that too, but it can get a little complicated for them sometimes. So, this time we just bought a pre-made sugar cookie roll for them to do. We got ours from Aldi, but I know Pillsbury makes some as well that you can get in most stores.


I helped the girls slice the cookies. I would suggest making them on the thicker side because they stay softer that way. If you like crunchy cookies, go thinner. I kept turning the roll as we sliced so one side wouldn't get flat.


Follow the directions for oven temp and baking time. Thank goodness ours only took about 8 minutes to bake. You know how impatient little ones can be when there is waiting involved!

Here they are! Super easy and they actually look like jack-o-lanterns! So cute!


I pulled out my baggies and jute to package them up all cute like so the kids can pass them out to friends. My bags came from a local craft store called Pat Catan's, but I have also seen them at Hobby Lobby. Can't remember exactly where the jute came from, but I know Dollar Tree and Dollar General have some. 


You can print the FREE sheet of tags here
*You may print as many as you need, but please do not claim them as your own. You may attach them to an item being sold, but you may not sell them outright.


Once you print the sheet, cut out the tags, hole punch the corner, and string it through! So easy! 


I hope you enjoy the tags! Be sure to add them to your Pinterest board! That way, if you don't use them this year, you will have them handy for next year!

If you use the tags please share your goodies! I'd love to see! Have an awesome day!

Love&Hugs

Sunday, October 18, 2015

Dollar Tree Skull Makeover


All of my kiddos are very crafty. So much so, that even when my craft room is clean...it doesn't stay that way for long, whether I am in it or not. So, I wanted to do a craft with my two oldest daughters to get some time together.

The skulls came from the Dollar Tree. I have seen them there for several years and we actually have one that we put a mustache on a few seasons ago and we set him out during Halloween too. His name is Bojangles.


Here are the supplies you will need to make one. Depending on your style, you may want to try a few different techniques.

Plastic skull (Dollar Tree)
Xacto knife
Spray Paint
Glue (I used E6000)
Rhinestones, pearls, buttons, flowers,sequins, beads, or other accents

Because these are so cheap, they aren't made very well. The seams where the plastic was fused together were pretty big, so I used an Xacto knife to smooth them out, followed by a few swipes of fine sandpaper. This isn't a 'have to' step, but I feel it made ours look better in the end.


Once I was done with that, I wiped her (yes, it's a she) down with a damp rag and then spray painted her with a cream colored spray paint made by Krylon. She got two coats of the cream and then a coat of the Rustoleum clear matte spray. Make sure you give them enough time to dry in between. Once the sealer is dry, the fun begins!


I started looking through my supplies and liked the idea of gold and teal. So, I pulled out some different things and started gluing sequins on, adding rhinestones, and then using my Sharpie marker to add some swirls and dots.


Here she is all fancied up!


Here is one my daughter made. I love how she used the metallic spray paint! Her design is really cool, but you could just spray them gold or silver and they would be a perfect addition!


Since we had all of these supplies already on hand, we only had $3 out of pocket for the skulls!

You could get really creative with this. Some ideas would be painting it ombre style or using artificial flowers for the eyes. You could add large googly eyes to make it funny, Possibilities are endless.

I say this was definitely a win and I think this is beginning an annual tradition for my kids and I.

If you do this craft or something similar, please show us in the comments!

Have a blessed day!


Saturday, May 30, 2015

Well, hello there! *and a freebie*

    So, a quick intro before we get started. I'm Heidi. 32 years old. 5 kids. 1 husband. 1 dog. Homeschooler. Maker. Crafter sounds too 90's and artisan sounds too snooty, so, I'm a maker. I make people. I make things. You name it, and I've probably at least attempted it at one point or another. I rarely get enough sleep (see; 5 kids). Youngest of 7. Married to an only child. THAT can get interesting sometimes. Lover of Jesus. Look like my mother, only got my dad's crazy eyebrows (don't ask how much wax I have to use to keep those things tame). Smiling is my favorite. Firm believer in if you don't have something nice to say, don't say it at all. Photographer (but not reeeeally). Book reader (if I ever get the time). Loathe parallel parking. Enjoy playing Lego's and blocks with my kids. Super hot showers are one of the best things ever on the planet. Morning person. Coffee helps with that. Give me a tent and a sleeping bag and I'm a happy camper, literally. My brain still remembers the pre children body, so when I go clothes shopping I hold things up and think I can wear them, only to laugh out loud in the dressing room when it won't fit past my hips. Been out of school 15 years. Never went to college. Starting college next week. Gasp! Next week is really soon. 

   Okay, that might have been a little too much info. Hopefully, no one has nightmares of watching a stranger try on jeans. Let's move on, shall we?

   I figured I would make my first blog post a fun one by giving you a free printable. This is an 8x10 format and would be totes adorbs in a frame or just taped up with some washi. Yes, I said totes adorbs. I have a 13 year old, so I get a free pass to use cool lingo out of my age range. Please do not go acquire a teenager for that purpose though, because you will be disappointed with the extensive whining and you may not be comfortable with being 'the worst person ever' upon saying no to a ridiculous request. Don't get me wrong, I love my kids, but there is a reason God gives them to you as babies all precious and sweet smelling. True story.

   If there is a chance you don't know what I am saying when I refer to 'washi', please crawl out from under your rock and Google it. I feel as though it should be a staple in every home. If you don't have some, get some. 

   Without further ado, the printable. Hope you like it! I'm gonna tape it up on my wall too! *You can print this to keep for yourself or give as gifts if you'd like, but please do not sell this print and do not claim it as your own. 


   I hope everyone has a great weekend! Stay safe and make memories! 

-Heidi <3